Friday, July 31, 2015

Harajuku Vibrations Quilt for my Sister

My sister's Harajuku Vibrations quilt
I have an awesome sister. She is a mom of three, a development director and grant-writer, and a blogger for Iowa City Mom's Blog. She kicks ass in her Nia classes, crochets coveted blankets, and belts out Meghan Trainor lyrics like nobody's business.
My beautiful and talented sister!

If you've been following my blog, you've been reading a lot lately about birthday quilts and pillows for various family members. In my family of origin, everyone's birthdays fall within one month of each other. We are summer people. Having come up with fabulous gifts for my folks and my brother, I needed inspiration for a gift for my sister. I found it in two places. The Winter 2015 issue of Modern Quilts Unlimited featured a pattern for Amy Garro's modern quilt "Vibrations". (Amy's original Vibrations quilt is for sale in her Etsy Shop, 13 Spools, here.) The colors in Amy's design are aqua and mulberry. These are absolutely my sister's colors. When I saw those colors, I immediately thought of my sister.
The original Vibrations quilt, by Amy Garro. Beautiful colors and quilting! I wish I could take pics like this!
For my own creation, I was limited to what I had in my stash. I loved Amy's colors, but didn't have enough yardage to replicate them. In fact, I didn't have enough yardage in similar colors to make the whole quilt (Garro's design is for a 60" x 72" quilt), so I decided on a 48" x 60" lap quilt instead.

I adore Gail Kessler's Dimples line (so soft!), and earlier this year impulsively purchased a couple of yards of a beautiful purple Dimples fabric at Thimble Pleasures, Chapel Hill's local quilt shop. It would obviously come in handy for something. Around the same time, Sarah Watts' enchanting Tokyo Train Ride collection had just come out. I have been in love with this collection.

Love this collection to pieces!
Binky time!


I limited myself to one print. The one I couldn't resist? "Harajuku" in aqua. Look at these bunnies, dogs, cats, and pandas! Did you just fall in love with these bunnies? My sister used to have pet rabbits. She has frequently explained rabbit psychology and mannerisms to me. She knows bunnies. Sister: I am expecting an internal binky when you see these patient, beribboned bunnies.
Harajuku in aqua by Sarah Watts for Cotton + Steel. Who can resist bunnies in bow ties?
What are these critters doing all in a row? They are waiting for the train, of course! Here is a picture of Harajuku station in Japan:

Harajuku Station, Tokyo, Japan
Harajuku is also famous as a hotspot for creative teen fashion, with close ties to the world of Cosplay. Can you find the bunnies?
Harajuku fashion. These gals own it. Sis, I think Anna would love this!
I am getting some crazy inspiration by looking at these fashions, especially the ultra fabulous giraffe/kimono/fuschia-hair outfit in the center front row. By comparison with these styles, my sister's quilt is very tame. I'm guessing she's okay with that.

Train map of JR East Railway Lines, Tokyo
For the back of my sister's quilt, I used remnants from the fabrics for the front and a variety of other purples I had in smaller quantities in my stash. You can see that the critters are still waiting for their train. The back shows off the quilting. I opted for straight line quilting that would echo the "vibrations" in Amy Garro's design. The quilting has an art deco feel to me, which I love. It also evokes a maze, or a detail from a train map (though it's a bit more orderly than this one).
My sister's Harajuku Vibrations Quilt, reverse
Sister, I love you! Your quilt is one the way, and I hope it brings you delight and the assurance that I am thinking of you every day. I wish you the happiest birthday ever! 

Monday, July 27, 2015

Fab Four Pillows for my Fab Brother


Fab4 Pillow for my Brother
My brother and I share a birthday. He is an award-winning teacher and Model Legislature coach. He is also a talented professional rock musician (check out some of his songs here) with a golden voice. When we were teens, his favorite band was the Beatles. Across the hall, in the car, and just hanging out, I listened to hundreds of hours of Beatles albums as my brother mastered guitar and vocal parts. We would sing together, along with our younger sister. Our Mom was so enamored of our sibling rendition of Help! that she still makes us sing it at family gatherings nearly three decades later. This is now traumatizing because we can't remember the order of the verses and my sister and I can never figure out which of us is suposed to sing which part. We've mostly moved on to other songs and newer artists, but, when we were growing up, it was pure fun.

My fabric habit frequently has me cruising ebay for bargains. A few months ago, I found a fabric sample book for the Fab4 line by British furniture designer Andrew Martin. It featured tapestry renditions of the inner gatefold from the iconic album Sgt. Pepper's Lonely Hearts Club Band, along with coordinating fabrics with funky chenille stripes.
Sgt. Pepper's inner gatefold, spoofing military fashions
I knew this oversized book was going to provide the raw materials for my brother's birthday present, but what exactly would these swatches become? When the sample book arrived, the answer was clearly pillows.

Reverse of Fab4 pillow above. Note the camouflaged red zipper, left of center.
Making pillows like these does not involve terribly advanced skills. But I had not made pillows with trim before, so it was fun to learn this new technique. Even more fun was hunting for the perfect trim (ebay again) to echo the cords and epaulets on the costumes worn by the Fab Four. I chose a twisted rayon lip cord in blue and gold for the first pillow, above. For the second pillow, below, which featured a taupe-gray-scale rendition of the same album art, I chose fringe trim in a matching taupe.

Fab4 Pillow #2, in taupe-gray-scale, with fun fringe trim
Reverse of Fab4 Pillow #2, with centered gray zipper, almost camouflaged
Thank you, brother, for being in my life! I love you to pieces!
Here we are looking pretty fab ourselves, in the mid-seventies (you can tell, right?).
Me and my Bro, about a decade after Sgt. Pepper's
And almost forty years later...

Monday, July 20, 2015

Owl in Freemotion

My "Blissfully Bookish" quilt, 2015
Recently, while working on the Moonglow quilt for my father's birthday, I found I needed a break from the intricately pieced compass blocks. I was also feeling creatively stifled, because all the fabrics had been preselected and included in the kit. They were all stunning, but there were no decisions for me to make beyond "do this now" or "do this later" and where to put the scraps. Truth be told, I was itching to put them in another quilt.
Different lighting shows more of the quilting on "Blissfully Bookish"
Fortunately, All People Quilt had just sent out an email featuring cute (and easy) animal quilts, and an adorable owl quilt based on a design called "Wise Guy" by Holly Hickman (download pattern here) caught my eye. The project involved very simple piecing, and had a great color scheme in browns, beiges, and green-blues.

I dipped into some of the teal scraps from Moonglow and assembled a collection of batiks, prints, and solids in reddish- and blue-browns. Luxurious silks by Pindler and Pindler added stunning texture to the plumage around the owl's face. For the background, I paired a variety of neutral decorator fabrics in linen and cotton with scraps of Michael Miller's Urbanista 20/20. The whimsical eyeglasses made my owl appropriately bookish. Marimekko's romantic print Hurmio (1999; "Hurmio" is the Finnish word for "Bliss") by Fujiwo Ishimoto in cotton sateen framed the eyes and provided a single flower in gold for the owl's soft belly. Maija and Kristina Isola's Nostosilta (a 1967 design reprinted and recolored in 2009, "Nostosilta" means "drawbridge" in Finnish; my blissful owl enjoys watching boats) makes for a vibrant border in blues and greens.
Detail of "Hurmio" print and free-form echo quilting on my blissful owl's belly

The smaller size of this quilt inspired me to experiment with new (to me) freemotion designs. I started with designs from Deborah Poole's You Can Quilt It! Stunning Free Motion Designs Made Easy. I used her Jelly-icious design around the eyes (detail below) and experimented with a variety of feather techniques, including the hooked feathers pictured below.
Detail of quilting around the owl's eyes, inspired by designs in Deborah Poole's You Can Quilt It!
More feathers and a leaf crown for my owl

Detail of quilting adapted from Deborah Poole's Four Square design 

Peacock Shell filler

Lots of different feathers
For the background, I wanted an organic quilting motif. LuAnn Kessi's "Organic Background Filler" was perfect, and was so fun to quilt.
Detail of background quilting, based on design by LuAnn Kessi
 My blissfully bookish owl was a great break from an intense project. When quilting becomes stressful I need to step back, take the pressure off, and remind myself to have fun.

Wednesday, July 15, 2015

Flip-flop Fantasia

My family and I recently enjoyed a fabulous trip to the beach.
Kitty Hawk, NC, photo credit Jessica Campbell. 
We brought our game-day quilt for a beach blanket, and loaded our supplies into the world's biggest tote bag:
Giant tote bag with happy polka dots
I thought I was beach-ready, right up until the moment when my bare feet hit the hot sand. I had gotten away without flip flops for a few years, but I hadn't been to the beach in a few years, either. This trip convinced me that if I wanted to spend more time in the sun and surf, I would need a pair of summer sandals.

Luckily, Anna Graham's new book Handmade Style included instructions for how to make my own. What!?! Homemade flip-flops? That's crazy. Crazy fun!

Graham's pattern provides a foot-bed template and easy-to-follow instructions. Steps include layering fabric with fusible interfacing (I used Peltex) to make the footbed, attaching straps made from bias tape, and using bias binding to sew the footbed layers together. I traced my own feet to create a custom fit, and added another layer of Peltex and a pair of Dr. Scholl's gel insoles between the layers of interfacing for extra cushioning. I used leftover strips of batting to fill in the space around the edges of the gel insole. I love the freedom of a flip-flop, but I'm not a huge fan of the flopping. Inspired by a pair of Chacos I once had (I could afford new ones if I hadn't spent all my money on fabric), I designed straps that secure the big toe and then criss-cross the foot three times.
Top view of the new kicks. You get to see my feet and my weedy lawn. I'm lettin' it all hang out today.
This part of the design process was pretty exciting, actually. It's so hard to find shoes that fit well. Custom shoes are a fantasy of mine. Being able to make my own: fantasy times three. The straps are surprisingly comfortable. They are snug enough to provide a close fit, stay on my foot, and eliminate flopping. They have enough stretch to slide on and off with ease. Perfecto!

The binding used to be a waistband
The tricky part was stitching the layers together. After I added the gel insoles, batting, and extra layer of Peltex, the shoe-sandwich was pretty thick. Regular bias binding would not quite do the trick. I needed something strong and stretchy. The solution? The waistband from a colorful pair of St. John jeans that looked far better on e-bay than they did on my body. The stitching was a bear. I broke two needles, my thread tension did not respond well to gel inserts, and I had to stitch parts by hand. But by the end of the day, I had a pair of sandals all my own.
Happy feet!
We head back to the beach in a few weeks, and these babies are going with me. If you have ever made your own flip flops, or any other kind of shoe, I would love to see them. Please share!


Tuesday, July 14, 2015

Quilting the Rainbow

Rainbow, by me, 2015, pattern by Lies Bos
On a recent trip to my hometown, my sister and I spent a delightful hour wandering through the Emmitsburg Antique Mall. In addition to trying on vintage hats and concocting our own "ugly decor" reality tv show, we admired many antique quilts. We marvelled at tiny, even stitches, still holding strong a century after patient hands had stitched them. We saw different skill levels on display and pictured women and girls of all ages working, teaching, and learning together. But as I took in the pale colors of each design, I couldn't help but wonder what our quilting mothers and sisters of generations past would have made with the bright, saturated fabrics of today.
Stash of many colors - imagine the possibilities!

I live in color. The walls of my house look like rainbow sherbet, each room a different color: sunshine yellow and straw-gold, tangerine and persimmon orange, burgundy wine and silverberry, periwinkle and azure, celery, apple green, ruby red... My favorite outfits make me look like the pied piper of Hamelin or one of my gypsy ancestors. Color makes me feel alive. It brings me energy and comfort. And since I am still a sixth-grader in my heart, I think there is nothing so beautiful as a rainbow.
A collage of my sherbet walls

Four thousand miles and an ocean away, Dutch quilt designer Lies Bos Varkevisser seems to agree with me. Some months ago, I was on the hunt to find the mother of all rainbow quilt patterns. I found this beauty, "Rainbow," in Lies's online pattern shop. Lies' stunning rainbow includes each color from the Ives Color Wheel, and incorporates color-principles presented in Joen Wolfrom's excellent book Color PlayMeasuring 60" x 83", the quilt contains 2200 2" x 2" squares and 44 stars. 
The full Rainbow quilt, with a gladiolus and phlox from my garden in the foreground
After constructing the quilt top, I designed and pieced a backing that contained the same color scheme in an easy, scrappy layout.
Back, Rainbow, 2015
In addition to the rainbow's beauty, its symbolism is important to me. As I worked on this quilt, my son was coming out, marriage equality efforts were in full swing across the United States, and at my workplace we were working to create a climate of greater inclusion for sexual minorities. I began the quilt early in 2015, and, as quilts often do, the top and back waited several months in the "I don't want to baste this" basket. The June 26 SCOTUS ruling in the case Obergefell v. Hodges prompted me to finish the quilt. Simple radiating lines from a bold orange star represent a light that shines into every nook and corner of our variegated life, bringing colors of joy and comfort, warmth and wonder.

Friday, July 10, 2015

Moonglow: Dad's 70th Birthday Quilt

Close-up, Moonglow
My father turned seventy this week. In honor of this landmark occasion, my mom declared that he needed a quilt ("everyone has a quilt but me," she reported him saying). Seventy's a big deal, and Dad's a big guy, in size, reputation, and personality. We needed an ambitious quilt.

I had been admiring Jinny Beyer's Moonglow quilt kit on Craftsy. I especially admired the rich, luminous play of color for which Breyer is so well-known. I included it among a selection of possible quilts that I shared with my mom, and she was drawn to Moonglow like a magnet.

Foundation pieced compass block, "Sea of Knowledge" - look at those points!
The quilt includes patterns for eleven compass blocks and two courthouse stairs blocks. The compass blocks can each be pieced in one of three ways: by hand, by simple machine piecing, and by foundation piecing. My experience with these techniques was a classic Goldilocks tale.

Jinny Beyer is famous for piecing by hand, so I thought I would give that a try. I found it relaxing, and it was easy to line up points - more so than with regular machine piecing. After completing two blocks by hand, I knew I would not finish the quilt on time for my Dad's birthday with this method. I switched to machine piecing, which was fast, for sure, but it was more difficult to line up the points, and I had to unstitch almost as much as I stitched. Next I tried foundation piecing. This bowl of porridge was just right. It took longer than simple machine piecing, but the resulting accuracy was well worth. For future blocks like this, foundation piecing will definitely be my method of choice.

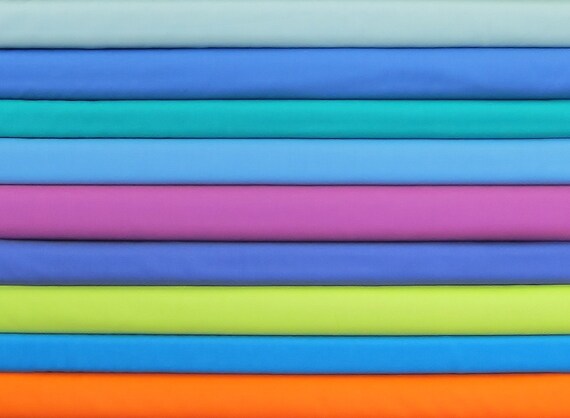
After I completed the quilt top, I wanted to do something special for the back that would complement the beautiful colors of Moonglow. It also had to be something I could piece quickly - the birthday clock was ticking. I found a pattern called "Golden Rectangles" in Jinny Beyer's book Quiltmaking by Hand. For the fabrics, I used scraps from the Moonglow kit as well and from my stash:
Golden Rectangles, the back of my dad's Moonglow quilt
Moonglow is a big quilt -- 86" x 86". For quilting, I had the idea that straight-lines on the diagonal would be much easier to quilt than vertical lines, as there would be less bulk to fit through the throat of the machine (I was right!). A piece of crown molding I found in the shed made a perfect guide for spacing and marking the quilting lines:
marking quilting lines with a piece crown-molding
   Here is Moonglow, finito:
And here is my Dad, loving his new quilt:

Monday, June 22, 2015

Modern Flying Geese

detail, my Modern Flyng Geese, 2015
A few months ago I saw a pattern on Etsy called "I'm Flying Modern" by Elena, featuring bright, modern solids against a lovely gray cross-hatched sky. Her quilt inspired me to design my own modern flying geese quilt.

Flying geese blocks are simple, but somewhat tricky. In the diagram below, the white portion of the block is the goose, and the black is the sky. Contrast between the two is important for achieving the illusion of a bird in flight. A row of flying geese blocks is meant to represent the orderly migration of a flock of geese.

In late December I had purchased this wonderful collection of Pure Elements solids, pictured below, inspired by Frances Newcombe's Safari Moon print collection for Art Gallery Fabrics.
gorgeous Pure Elements solids: a starting point for my palette of geese
After auditioning the fabrics, I decided not to use the chartreuse and orange. Instead, I swapped in some spring green, purple, and pale peach. 

The bright colors would be my very energetic geese. They would travel boldly across cloudy skies, some puffy white snow-clouds, some lightly overcast, others stormy grey or darkest night. They would form orderly rows, but they would not all be going in the same direction. 


I made all the geese first, then settled on a layout. As this was my first time making flying geese blocks, I used a helpful tutorial, linked here, by Karen Johnson from ConnectingThreads. You can see that I managed to preserve most of my points, but the height of my geese blocks was not uniform. I answered my momentary longing for order and perfection (I know, ridiculous on both counts) with a reminder that in nature, geese, like people, come in all sizes. Why should mine be any different? I can only tolerate so much order, anyway. Clouds, on the other hand, remind us of the imaginative possibilities of a glorious disorder. The answer? An extra patch of cloud chasing the geese, above left. 

For the border, I used a geometric print by Sunbrella that reminded me of moons and snowballs and seemed a perfect whimsical pairing for my happy geese. For the backing I chose a field of mushrooms in a grayish taupe. I don't know if geese eat mushrooms, but if they do, they'll have plenty to snack on. 

Rows of echo quilting accentuate the geese and create a whimsical zig zag effect on the quilt's back. I pieced the binding from a wild variety of bright printed fabrics that coordinate with the geese and frame the neutral border with a riot of color. Despite their appearance of order in flight, geese can be rambunctious. I like that. From a safe distance. 

Update on Modern Flying Geese: I am delighted to report that this quilt has been purchased and the geese are flying to their new home in Australia. Safe travels!